Leave it to Facebook to cause a stir rolling out the Timeline feature for business fan pages last week while only allowing businesses 30 days to make the transition to timeline. That’s right come March 30, 2012 Facebook will be flipping the switch and all fan pages will be published in the new timeline format. This of course has many fan page owners sweating – as making the change requires some effort to do it well. But never fear – even though change is difficult – SocialNicole is here to help guide you in the transition. Believe us we have been working day and night for our clients to help them and nwo we will share some tips with you to make this a fun and easy transition
Here are 4 tips to help you transition your Facebook fan page to timeline:
1. Most Important Thing to Note – Preview Mode
By starting the transition process now, you get a chance to preview your Timeline as you make changes and adjustment. The public will not see your changes until you click the publish button or March 30, 2012 which ever comes first. Make sure you use this time to test out the waters and tweak your page.
2. Cover Photo
A cover photo is the first thing a user sees when they visit your Page. A cover photo offers a unique opportunity to display who you are visually. So be creative and don’t just slap your logo up there – what could be more drab and mundane than another logo? I have been looking around for some unique fan pages who have already created cover photos for their Facebook page and here are a few samples (remember these brands came up with this on the fly so more great cover images will be sure to pop up).


My tips for creating an amazing Facebook timeline cover photo design:
- Make it big and bold! Although you are only required to have a cover image of 399 pixels wide, why not use the space provided and make it the full 850 x 315 pixels ? Use the real estate that Facebook provides!
- Be creative and ask others what ideas they like or have for your brand. Make sure to include your customers in the process.
- Hire a designer to create the final image. Yes, that means you may need to spend some money to get something great. If you are not comfortable with design software and creating amazing graphic designs than it’s worth paying for this image. Being that it’s the first thing people will see when landing on your Facebook page, it is practically equal in importance to your website design – so spend some money and make it shine.
- Remember your core message and make sure you stay true to that.
- Follow Facebook Rules on Cover Images (it’s true, there are rules and you will want to follow them) the rules include:
(taken directly from Facebook Help center article titled: “How should I choose a cover image for my Page?”)
Cover images must be at least 399 pixels wide and may not contain: Price or purchase information, such as “40% off” or “Download it at our website”. Contact information, such as web address, email, mailing address or other information intended for your Page’s About section. References to user interface elements, such as Like or Share, or any other Facebook site features. Calls to action, such as “Get it now” or “Tell your friends” All cover images are public, which means anyone visiting your Page will be able to see the image you choose. Covers must not be false, deceptive or misleading, and must not infringe on third parties’ intellectual property. You may not encourage or incentivize people to upload your cover image to their personal timelines.
3. Pick Your Featured Apps Carefully (Goodbye Tabs of Yesterday!)
No more tabs…does this make you happy, sad or indifferent? Regardless of how you feel the fact is they are going away, so jump in and figure out how to manage those apps you have loaded. This means no more custom welcome pages either so say goodbye to all those fan gating pages!  So where are all those tabs going to appear? All apps are now located below the right hand side of the cover photo.Note you only get to feature up to four apps at one time they will be four apps of your choosing, so pick the ones that are most important to you. The rest appear only when user clicks the arrow button. To select your 4 top apps, simply click the arrow to expand the app box so you can see all your choices. Then, hover your mouse over the app you want to move and you will see a pencil icon. Click on the pencil icon and you will get a menu of choices to move the apps, delete and make changes.
4. Highlight What’s Important to You
‘Hide, Star or Pin’ is a new feature with Facebook that gives admins a tremendous amount of power in featuring posting content. When you post something new, icons will appear on the top right hand side of the post (only visible to admins). Hover over the top of a post and you will see a ‘Star’ and ‘Pencil’ icon. By clicking the ‘Star’ icon you are making the post wider and more prominent. Use this icon for upcoming events, accomplishments or something you want to make sure doesn’t get missed. But don’t use it for every post or it will lose it’s visual power.

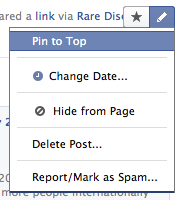
Next you can click the ‘Pencil’ icon and you will get some more choices for what to do with your post including:
“Pinning” an item so it remains the first item people will see. You can also change dates, hide the post or delete it. As we’ve seen, there are many changes coming towards you in the big switch to Timeline but the process doesn’t have to be tedious or intimidating. I think the whole layout and features make for a more organized page and allows for easier use. Furthermore, it creates community and presents the opportunity for your audience to have a personal brand experience every time they visit your page. So go ahead jump in and test the water. You’ll be glad you did!
